Once you measure a building for radon and determine that levels are too high, there are steps that you can take to REDUCE RADON.
Health Canada has provided guidance on how quickly to act after you have received your test results, but it is up to the homeowner to make the decision for how fast they are able to reduce levels.
RADON MITIGATION is the process used to reduce radon gas concentrations in the occupied spaces of buildings in order to reduce occupants exposure to elevated levels of radon. It can include measures which will include sealing, removing or ventilating. A C-NRPP Professional can help you determine which methods will be the best for your home.
You can find a C-NRPP Professional in your area.
When you are contacting a professional to help you. Here are some questions you should ask:
- – Proof of past work.
- – References or photos of past work.
- – A plan and schedule for the work to be done.
- – Proof of C-NRPP Certification.
- – When do they plan to do an onsite inspection of your home.
- – Do they have liability insurance.
- – What steps they do as part of the ‘Communication Testing’ or diagnostics prior to installing a full system; they should have a clear plan on how they design and plan to install your system.
- – Do they charge a separate rate for diagnostic testing.
- – What type of monitor will be left in place to ensure the radon reduction system is working continually.
- – What type of testing will be conducted after the system is installed to confirm it has been effective in reducing radon levels.
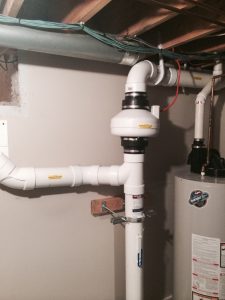
The most effective method of RADON MITIGATION is by removing radon through the use of Active Soil Depressurization(ASD).
Health Canada has released research on Active Soil Depressurization method which shows in 52 homes,
all homes were reduced to below 200 Bq/m3.
Steps to install a RADON MITIGATION System:
(Active Soil Depressurization (ASD) Method)
- – Test for RADON, if a long-term test hasn’t already been conducted.
- – Contact a couple of professionals who are C-NRPP certified as a RADON MITIGATION Professional. Ask them the questions listed above and get a quote.
- – Contractor conducts a Scene Survey on the home to determine possible locations for installing the suction points and discharge location for the Radon Mitigation System and a pipe route. This should include discussions with the homeowner so you understand where the system will be installed and why they chose that potential location(s). Proper discharge clearances are required.
- – Contractor conducts diagnostic testing to ensure chosen suction point will be effective and develops a system design, installation plan, and schedule.
- – Contractor assesses the foundation of the house and determines the needs for sealing areas which may draw conditioned air down into your sub-slab area, or reduce the effectiveness of the RADON MITIGATION system. These can include the sump pit, holes or cracks in the foundation open to the soil, floor to wall crack, openings under the furnace, openings under that bathtub.
- – Contractor installs RADON MITIGATION system and conducts a short-term radon test of at least 48 hours to determine if it has been effective. This 48 hour period should start at least 24 hours after the mitigation system was installed.
- – Homeowner tests the home again with a long-term radon test (minimum 91 days) during the following heating season to confirm radon levels have been lowered effectively.

